Dubsado Workflow Tutorials: Set Up an Automated Enquiry Workflow
June 5, 2024
Dubsado workflows can literally change your life because instead of you having to do everything manually, you can set them up to run themselves.
While they can be a bit tricky to set up if you’re DIYing it, they’re well worth it, especially when it comes to your enquiry workflow because this is the first impression you’ll make on a potential client. So if you’re ready to get your Dubsado enquiry workflow set up and running, all you have to do is follow the step-by-step instructions in this blog post.
What are Dubsado Workflows?
If you’re wondering what a Dubsado workflow even is, I got you. Essentially, it’s just a series of steps. A workflow for making tacos might look like gathering all the ingredients > chopping everything up > grilling the meat > warming the tortillas > making the salsa > assembling the tacos > dumping a ton of hot sauce on (if you’re into that kind of thing) and enjoying.
But for Dubsado, your workflow might look like receiving an enquiry > sending an automated email letting the person know you’ve received their enquiry > approving an email with a discovery call link to be sent > sending an appointment reminder email after they’ve scheduled.
And with Dubsado workflows you can set it up for all of those things to happen automatically.
In general, before you create your Dubsado workflows, you should…
- Have your client process mapped out
- Create all of your Dubsado forms (questionnaires, lead capture forms, proposals, etc.)
- Have all of your canned emails uploaded (whether you bought them or wrote them from scratch yourself)
- Created your different types of schedulers (30-minute discovery call, 1-hour kickoff call, etc.)
- Set up your packages
- Created your payment plans
And that’s because your workflows will likely use all of those elements, so you want to make sure you’ve built out all of these elements first. Then you can create your workflows.
While the workflows that will be best for your business will totally depend on your unique client process, an enquiry Dubsado workflow is one just about every online service provider should set up.
Lead Capture Workflow
Your client process starts before someone actually becomes your client. (That’s why making sure your online presence—like your website and your enquiry form—is on-brand is easy to use is also super important.)
And, if you want an interested person to become a real-life client, you want to make sure you set your client process up to assure them you’re the top-notch person to choose from the second they enquire.
Which is why you want your enquiry process to be automated so that when someone submits an enquiry, they immediately receive an email letting them know that you’ve received their enquiry. (That way, they aren’t waiting around, wondering when they’ll hear from you.)
A lead capture workflow might involve these steps:
- Lead fills out lead capture form
- Lead receives automatic email confirming enquiry was received
- You review the enquiry and either
- Send a rejection email
- Send an email with a link for them to book a discovery call
- Lead schedules a discovery call
- You two hop on your discovery call
- After, if it’s a good fit, you send a proposal
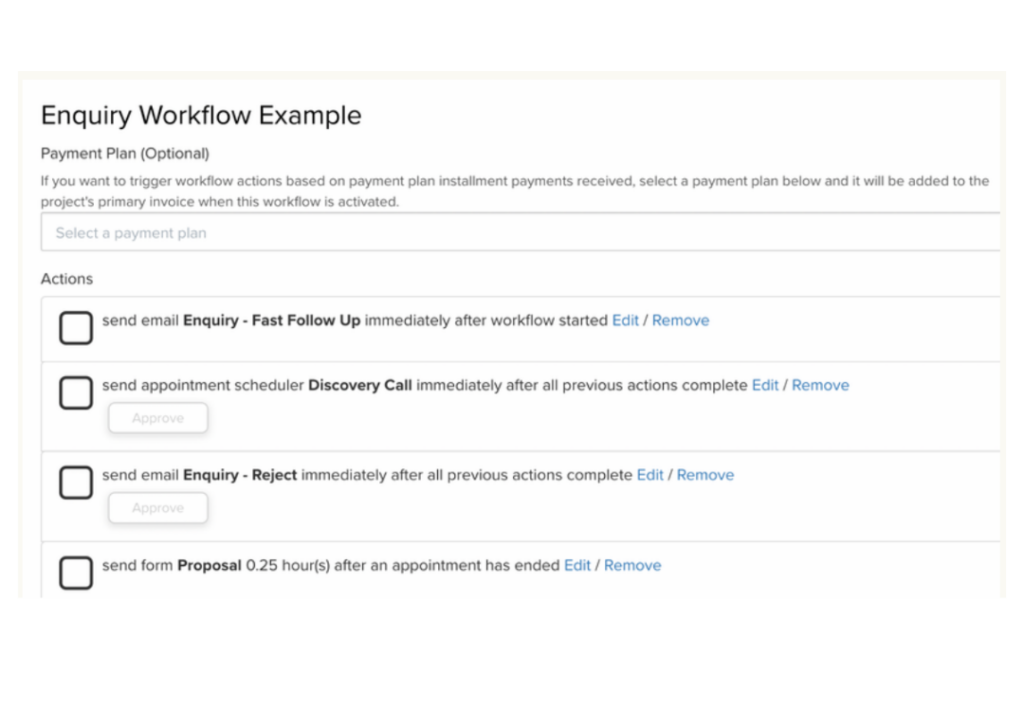
To set up an enquiry Dubsado workflow (like the example above), follow these steps:
Step 1:
Go to Dubsado “workflows” > click “add workflow” > “add action”
Next, you’ll choose “send email” > for “when” you’ll select “relative” > 0 days > “After workflow started”
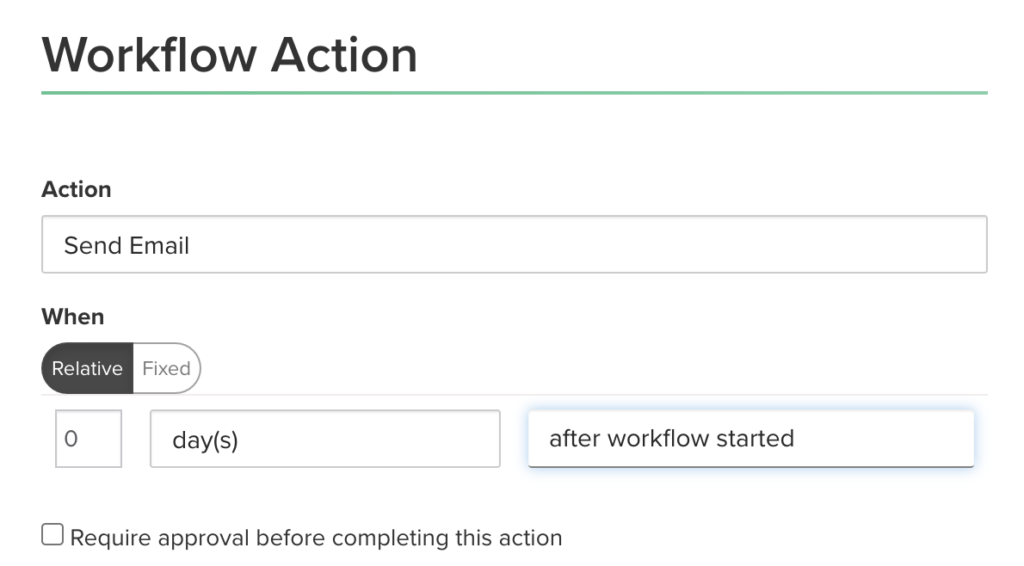
You don’t want to check the box “require approval before completing this action” because you want this email to send automatically and immediately.
Then from your list of canned emails that you’ve written out and added to Dubsado, you’ll choose your general enquiry response email that lets a lead know you’ve received their enquiry and will be getting back to them in a few days.
Step 2:
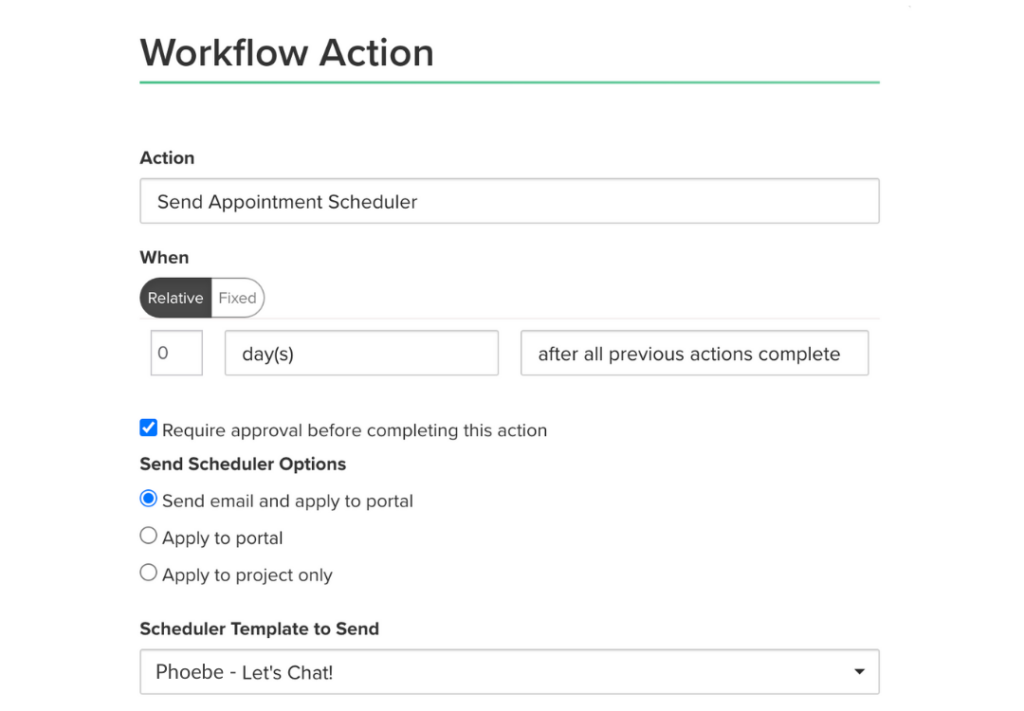
After that, you’ll click “add action” > and choose “send appointment scheduler”
For “when” you’ll select “relative” > 0 days > “after all previous actions complete”
BUT. For this one you’ll want to select the box “require approval before completing this action”
Under “Send Scheduler Options” you’ll select “Send email and apply to portal”
Then you’ll choose your accepted enquiry email from your list of Dubsado canned emails.
Step 3:
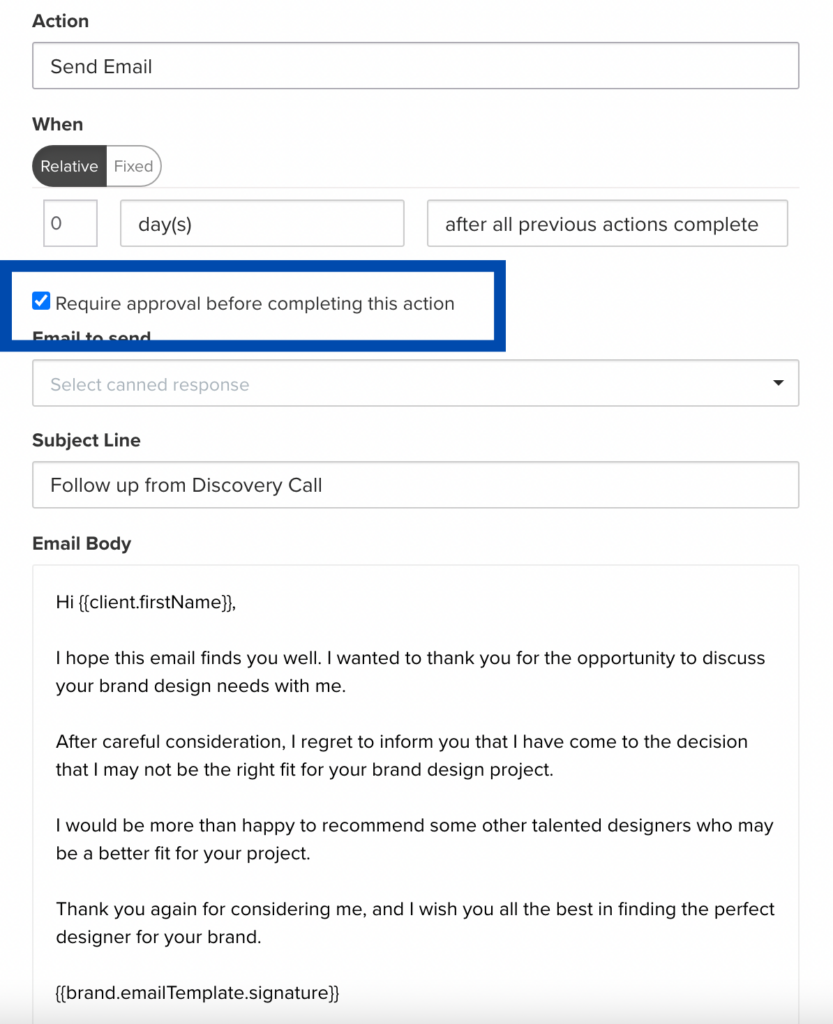
You’ll also want to give yourself the option of rejecting a lead that isn’t a good fit which means you’ll want to add another action that sends a rejection email.
To do that click “add action” > send email” > for “when” you’ll select “relative” > 0 days > “after all previous actions complete”
You’ll definitely, absolutely, want to select the box “require approval before completing this action” so that your enquiries don’t get automatically rejected.

Step 4:
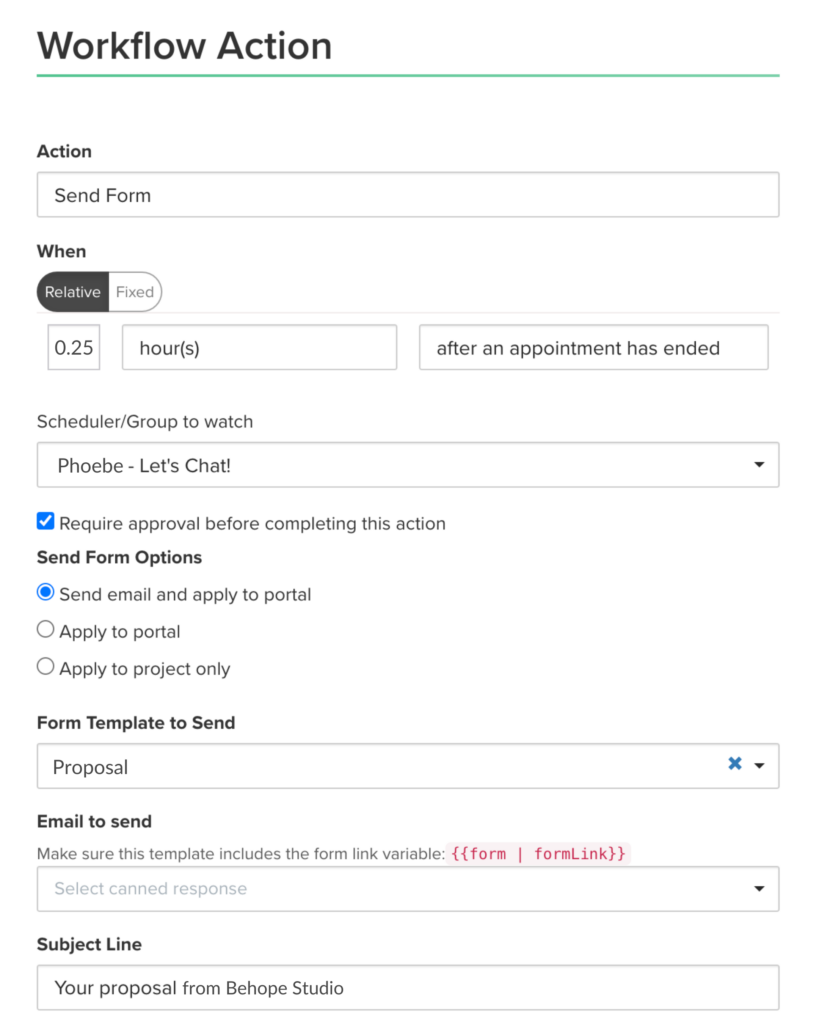
If the discovery call goes well, you want to include in your workflow a step that prompts you to send your proposal.
To do that click on “send form” > for “when” you’ll select “relative” and then choose whatever amount of time you want to give yourself after your discovery call has ended to send the proposal, for example if you want it to be 15 minutes after…
You’ll type in .25 select “hours” and select “after an appointment has ended”
Then you’ll select your discovery call from the scheduler list.
If you want, you can check the “require approval before completing this action” box. (This can be helpful if you have anything you want to edit in your proposal before it gets sent.)
Under “Send Form Options” you’ll select “Send email and apply to portal”
Under “Form Template to Send,” you’ll select your proposal form.
And under “email to send” you’ll select your proposal email from your canned email list.
Overall, your Dubsado enquiry workflow should look like this:
One last step that you don’t want to forget (otherwise the whole workflow won’t work!)…
Make sure you connect your enquiry workflow to your lead capture form.
And you’ll know it’s connected by going to your Dubsado forms, clicking on your lead capture form, and checking the settings.
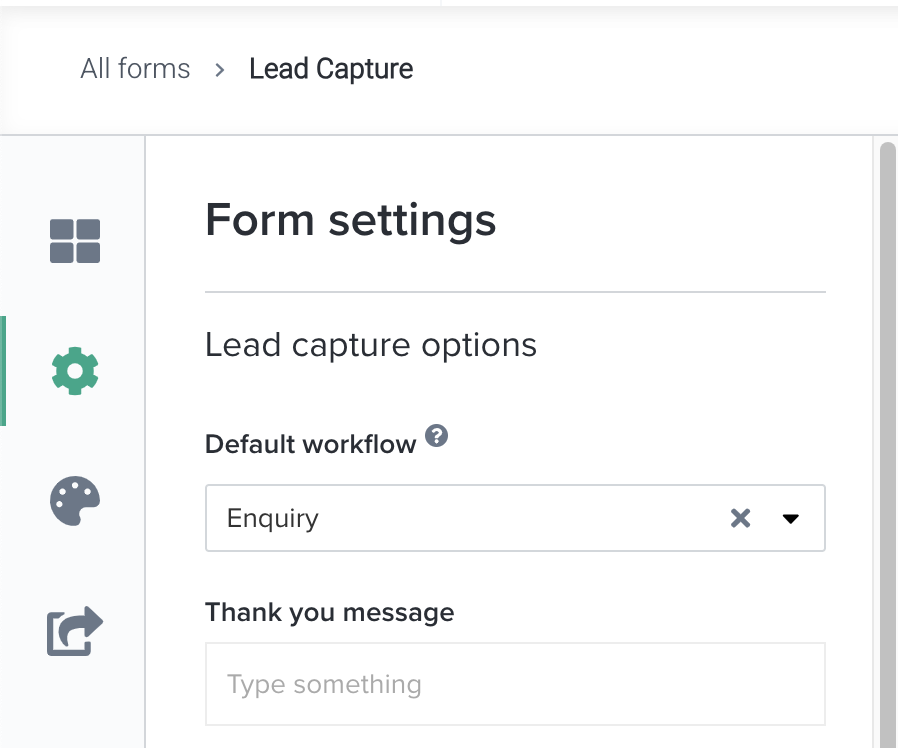
See that “Default workflow” section? Make sure you select your enquiry workflow from the drop-down list. That way, when someone submits an enquiry, your enquiry workflow will begin.
Once you’ve got your Dubsado enquiry workflow set up…
Test it!
All you have to do is submit an enquiry yourself and use a real email address so that you can see if the automatic enquiry response gets sent to your inbox. Then you can experiment with approving the discover call email that sends a link to book, scheduling a fake discovery call as a fake client, and then sending over a proposal.
That’s the best way for you to experience the enquiry workflow experience from both sides.
Now you’ve got all the info you need to create a fabulous, automated Dubsado workflow on your own.
Want more help setting up your Dubsado enquiry workflow?
Check out my Dubsado Workflow Blueprint, that walks you through setting up your enquiry, onboarding, and offboarding workflows and includes all of the emails you’ll need to send in them (all written for you!).